Showing posts with label photoshop. Show all posts

5 Photoshop Tips For Better Portraits

You don’t have to master Photoshop in order to be able to edit your own portrait photos and make them look better. Today, I decided to share with you my top 5 Photoshop tips for better portraits. All of these Photoshop tips are very easy to apply and they will surely help you turn any boring portrait photo into a professional-looking image! Plus, you’ll get two extra-tips for further improving your portrait photos! 
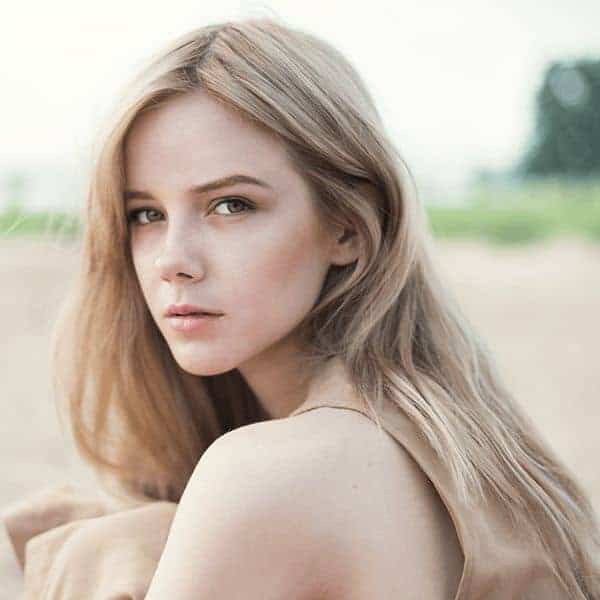
For this quick tutorial I will edit a free image I found on freeimages.com. 
girl portrait
Extra-tip: Before starting editing the photo, you should make sure the colors, brightness and contrast are perfect. Edit these before going on to the next steps. Also, you can use the Dodge/Burn tools to lighten or darken specific areas.
girl portrait_edit 1
1. Edit the Eyes 
The look of the model in a portrait photo is essential! Eyes are a very important element of  a portrait and you should always begin with them when you are editing a photo. I usually whiten them, remove any red-eye effects and if it is the case, I remove some of the wrinkles or other imperfections. Keep in mind though that not all wrinkles or imperfections are bad, so don’t overdo it! 
Edit the Eyes
In this case I made her eyes whiter so they will pop out and make the overall portrait photo look better. I used the Dodge tool. 
2.  Spot Healing Brush Tool 
The spot healing brush tool helps you remove any distracting blemishes, bruises or other skin imperfections. You can also use the spot healing brush tool for removing any shadow spots or stains on the lenses. Don’t overuse this tool! It’s OK to remove acne marks, blemishes or some wrinkles, but keep the freckles and expression lines. 
spot healing brush tool
3. Whitening the Teeth
For this photo this step wasn’t necessary. You whiten the teeth using the Dodge tool. I find this to be the easiest method. Proceed just like you did for editing the eyes. The Dodge tool works just like a normal Brush tool and whitens the areas it’s applied to. 
4. Using the Patch Tool
The patch tool is a fantastic way to blend in areas or even to remove unwanted shadows or imperfections in a portrait. Simply select the area around the element you want to be blended in and drag it to the area closest to it. In this case I used the patch tool to remove some unwanted strands of hair on her face. I could have used the spot healing brush tool also, but this is an easier method. 
patch tool
patch tool hairs
5. Skin Softening
It is very important to naturally soften the skin without going to extremes. Here’s how you can do this:
Duplicate the current layer by clicking Layer > Duplicate. Click Filter > Blur > Gaussian Blur. Blur the duplicate layer as much as possible while still retaining the features such as mouth, eyes etc. Click OK. 
Apply a layer mask to hide the blurred layer. This will help you mask out the parts of the face you want to airbrush. Hold down the ALT key and click on the Add Layer Mask icon in the layers palette toolbar. 
layer mask
Now it’s up to you. Don’t airbrush too much. Click on your brush tool and then click on the foreground/background color reversal arrow to make your foreground color white. Use a very soft brush (hardness of 0%, opacity 10%).  Brush around the face, but do not brush over the eyes, mouth and face edges. 
You can lower the opacity of the airbrushed layer if you think it is too much. 
Extra-tip – Liquify Tool:
This is the tool which makes models look skinny, have fuller lips and perfect body shapes. This is another Photoshop tool you don’t want to use too much. Keep it natural and beautiful. In this case I will use it to correct a slight imperfection of the model’s lips. 
Select Filter > Liquify. I’ll use the Forward Warp Tool (W) to correct the lips shape and then I’ll use the Bloat Tool (B) to make them look fuller. Adjust the Brush Size from the right panel. 
liquify select
Here’s the final result, the before and after photos. 
before and after
~ Ruxandra Micu

How to Turn Your Photos into Lego with Photoshop

Turn any of your photos into a brick mosaic inspired by the official Lego photo app! This Photoshop tutorial will show you how to create the effect from any photo and it’s really easy to do. You’ll learn how to pixelate your photo, create a brick pattern and overlay it on top of your photo, and compress the bricks into a limited color palette to make it look more realistic. Follow this tutorial and create your own cool brick mosaic photo!

Video Tutorial


Preview of Final Results


Step 1

Open any image you like into Photoshop. We recommend using an image that’s at least 2000×2000 pixels. If your image isn’t large enough, you can use the Image Size tool (Image > Image Size) to resize it up – don’t worry about getting a blurry image from upscaling because we’ll be pixelating it anyways!
I’ll be using this image from ShutterStock. Simple photos like the one below will have better results than a busy photo (ex. cityscape photo).

Step 2

Duplicate the layer so that you have a backup copy. You can duplicate your layer by pressing Ctrl/Cmd+J. Rename this layer to “Bricks”. Right-click on the new layer then select “Convert to Smart Object”. By converting the layer into a Smart Object, we can apply Smart Filters which give you the option of changing your settings at a later time.

Step 3

Next, go to Filter > Pixelate > Mosaic. Adjust the Cell Size setting until you can barely make out the image. This setting will determine the size of your bricks. Remember the cell size setting because we’ll need it for the next step.

Step 4

Create a new document (Ctrl/Cmd+N or File > New) with the same width and height as the cell size setting you used earlier. For example, if you used the Mosaic Filter with a cell size of 64 square, then you would create a new 64×64 pixels document.

Step 5

Press Shift+Backspace or go to Edit > Fill to open the Fill tool. In the drop down menu, select “50% Gray” then click OK.
Your document will be filled with 50% gray.

Step 6

Select the Ellipse tool (U) then create a circle in the center (the color of the circle doesn’t matter).  You can create a perfect circle by holding the shift key. Switch to the Move tool (V) to position it in the center of your document.

Step 7

Now we’re going to turn create a bevel from the circle using layer styles. Go to Layer > Layer Style > Blending Options. Set the fill opacity to 0 – this will make everything but your layer styles invisible.
Select and checkmark the Bevel & Emboss layer style. Set the technique to “Chisel Hard” then adjust the size so that you get a bevel thickness like shown in the image below. You can also adjust the shading angle which is 120° by default – I changed mine to 90°.
Next, enable the Drop Shadow layer style. Set the Distance to 0px then adjust the size so that it looks like the image below. Click OK to apply the layer styles when you’re done.

Step 8

We’re done creating the button in the center of the brick. Next, we’ll add a subtle bevel to the outer edge of the brick. To do this, we’re going to apply a layer style to the background layer, but before we can do that, we need to convert the Background layer into a regular layer. You can do this by double-clicking the background layer or right-clicking and choosing “Layer from Background”.
Right-click on the Background layer then choose Blending Options. Enable the Bevel & Emboss option then set the Technique to Chisel Hard and Size to 1-2px (so that it looks similar to the image below). If the bevel looks too strong, you can lower the Highlight/Shadow Opacity setting on the bottom. Click OK to apply the layer styles.

Step 9

Now we need to turn this image into a pattern. Go to Edit > Define Pattern. Name it anything then click OK.

Step 10

Close the current document without saving and switch back to your main Photoshop document. Create a new Pattern adjustment layer by clicking on the New Adjustment Layer button in your Layers panel then selecting Pattern.
Select the brick pattern then click OK.

Step 11

Change the blending mode of your layer to Linear Light. You’ll now have a brick image and this is what your photo will look like if bricks came in every color and shade.

Step 12

Because bricks don’t come in every color and shade, we need to compress it to a more limited color palette. We’ll do this with two layers; one to affect the tone and the other for the color. In your Layers panel, click on the New Adjustment Layer button then select Posterize. Move this layer below your Pattern Fill layer then change the blending mode to Luminosity. The Luminosity blend mode prevents your layer from affecting the colors in your image.
=
Adjust the Levels setting to anywhere from 4-8.

Step 13

Now we need to compress the saturation of the colors to a more limited range. To do this, create a new red Solid Color fill layer by clicking on the New Adjustment Layer button in your Layers panel and selecting Solid Color.
Pick any color then set the S (Saturation) to 75% and B (Brightness) to 100%. The H (Hue) can be any color. Click OK.
Move this layer below your Pattern fill layer then set the layer blending mode to Saturation.

Final Results

Here’s the final results! You can adjust the opacity of your Posterize layer if you need to bring back more tone into the image.
If you want your brick photo to look more like the official Lego Photo app, simply change the blending mode of your Posterize layer to Normal.

Download the PSD 65MB

photoshoptutorials.ws

9 Easy Steps to Creating a Powerful and Emotional Effect in Photoshop

In this quick tip tutorial you will learn how to create a  powerful emotional effect for your photos. By reading this tutorial you will be able to convert an ordinary looking photo into a beautifully striking one in 10 minutes or less.

What you’ll be creating

Quick-tip tutorial in 9 easy steps. Time to complete: 10 minutes. You will need Photoshop CS5 or newer to follow this tutorial.
final-results

Step 1

Create a Curves Adjustment layer (Layer > New Adjustment Layer > Curves) then set the blending mode to Screen. Press D to set the colors to default. Click on the layer mask of the curves layer and press Ctrl + Backspace to fill the mask with black. With a round soft white brush paint over the eyes (make sure you have clicked the layer mask before painting). If the eyes are too bright lower the opacity (in this specific case I lowered the Opacity to 55%).
1
1b
1c

Step 2

Create a Black & White Adjustment layer (Layer > New Adjustment Layer > Black & White) and set the blending mode to Multiply.
2

Step 3

Press Ctrl + Shift + Alt + E to create a new layer from all the visible layers. Go to Image > Adjustments > Shadows/Highlights and play with the sliders in order to lighten the image a little bit. Drag the Highlights slider all the way to the left and drag the Shadows slider to the right until the image is a little bit lighter than before.
3
3b

Step 4

Press Ctrl + Shift + Alt + E to create a new layer from all the visible layers. Select the Dodge Tool (leave the default settings – Range: Midtones, Exposure: 50%) and paint over the following parts: eyes and especially the irises, tip of the nose, cheekbones, forehead, lips, tip of the chin, neck.
4

Step 5

Press Ctrl + Shift + Alt + E to create a new layer from all the visible layers. Go to Filter > Sharpen > Unsharp Mask. Use a 1-2px radius and 50-100% Amount to sharpen the image. Try to achieve a fairly mild sharpen effect – too much will make it look bad. You can also lower the Opacity to lower the effect.
5
5b

Step 6

Create a Hue/Saturation Adjustment layer (Layer > New Adjustment Layer > Hue/Saturation). Drag the slider to the left until the image is fairly desaturated.
6
6b

Step 7

Create a Gradient Map Adjustment layer (Layer > New Adjustment Layer > Gradient Map) with the default settings (black and white). Set the blending mode to Soft light. This will increase the contrast.
7
7b

Step 8

Create a Curves Adjustment Layer (Layer > New Adjustment Layer > Curves). Drag the right slider to the left in order to boost the highlights.
8
8b

Step 9

This step is optional, follow it only if you want to add a little artistic effect.
Create a Gradient Map Adjustment Layer and choose one of the colored presets. Set the blending mode to Soft Light and lower the Opacity if the effect is too strong.
final-results[1]
9b
Below you can see some before and after comparison photos.
9c
OLYMPUS DIGITAL CAMERA

Final Results

final-results[2]

Download the PSD

NEWS